Click any image for a larger image.
Before you start, if your engine is not warm, start your engine and let it run for at least 5 minutes to heat the transmission up.
Next, jack the front of your car up and place it on jack stands. You may also drive your car onto car ramps. If you use jack stands, I found it easier to do with the wheels removed. Whatever is easier for you is fine. Make sure that before you raise your car, or after you drive up onto the ramps, you set your parking brake. If you have tire chalks, use them. This is to keep that 3600 pound piece of machinery above you from getting too close and personal.
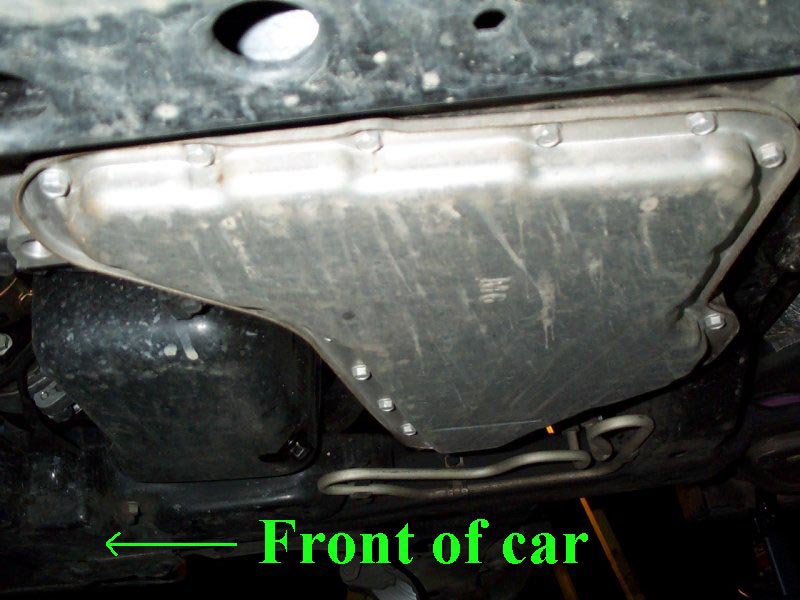
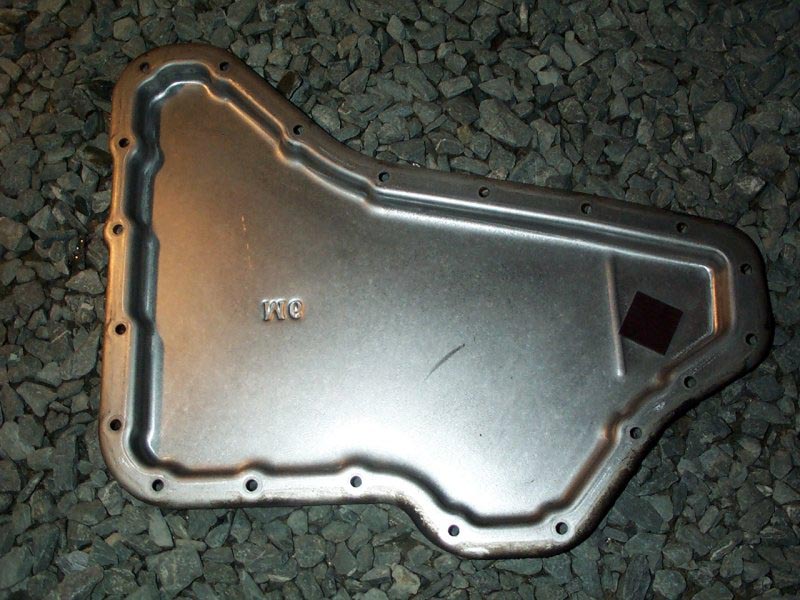
Once your car is raised, look under your car and locate your transmission pan. It is the silver/gray looking pan with 20 bolts holding it in place. See pic below.
There are at least 8 quarts of fluid being held up by that shallow pan. This means that if you remove the bolts too quickly, you will be taking a shower in transmission fluid. The key to it is to completely remove several of the bolts on one side and loosen the bolts on the other side. This causes one side of the pan to drop a little lower than the other side, and allows the fluid to slowly leak out. In the picture above, I find it easier to remove the bolts from the side opposite you. The pan is thinner on that side, and it isn’t wider than my drip pan.
Remove about 6 to 7 of the bolts on the opposite side, and slowly start loosening the rest of the bolts. Once the fluid starts to leak out, make sure you have your drip pan under it. If the fluid isn’t leaking out fast enough, slightly loosen some of the bolts closest to the leak, and it will leak faster.
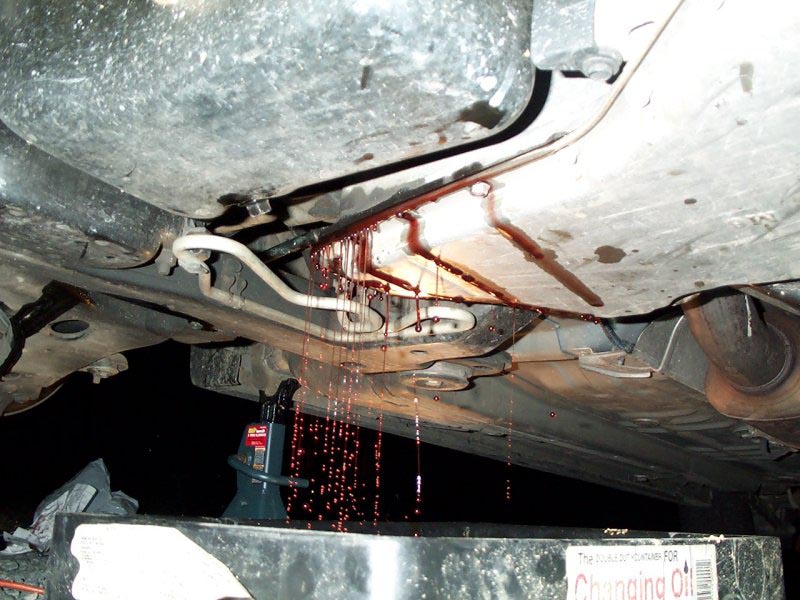
You can see in the picture below that the fluid is only leaking from the one side.
Once the leak has stopped, starting at the side closest to the leak, slowly start removing bolts. There is still some fluid left in the pan, so each time you remove a bolt, a little more fluid will probably drip from the end. When you get to the last bolt, you have to be careful not to drop the pan on your face (NOT GOOD). I just press up on the pan with one hand while removing the last bolt with my other hand. Once the bolt is removed, I grab the pan with both hands and angle it down to empty the last bit of fluid into the pan. Some of the transmission components will have fluid on them still, and they will be dripping. So if you are not careful, it will drip into your eyes/ears/nose/mouth.
Once you have the pan off, set it to the side. Make sure you keep the drip pan under the transmission, as fluid will still drip.
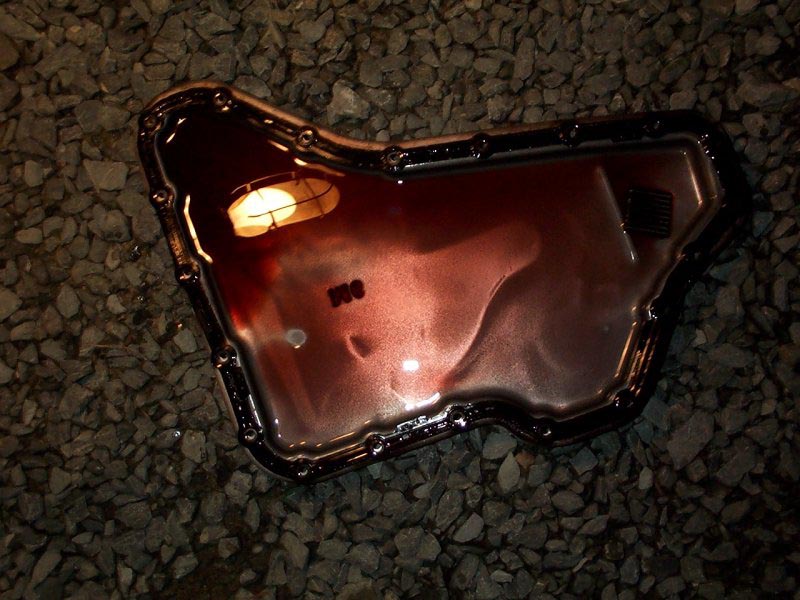
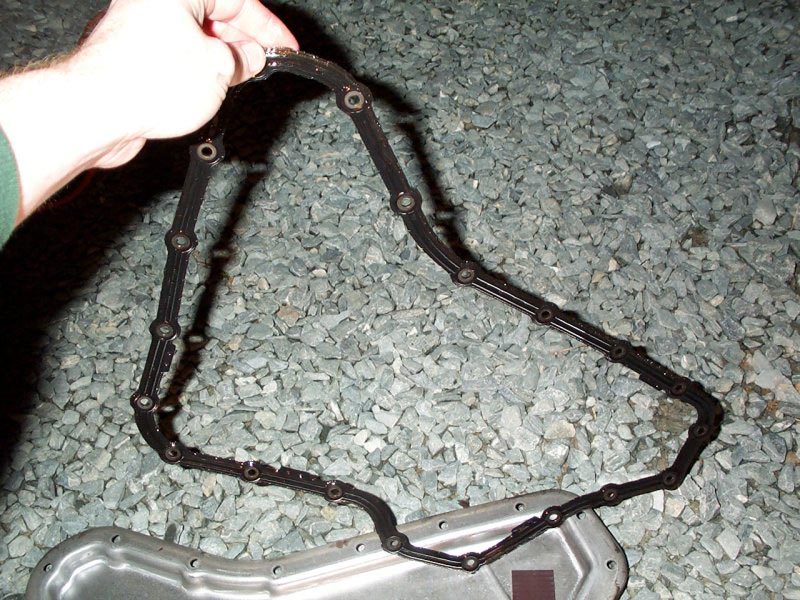
This is what the pan looks like once it is removed. The gasket is still on the pan. You can see the reflection of my work light in the fluid, so don't look for that in your pan. The one thing you don't want to see in this pan are large chunks of metal, or metal shavings. If you have them, you might want to have a mechanic look at your transmission. If it is still under warranty, you definitely want to have it looked at. I asked my Magic 8-Ball what to do if you see metal chunks, and it came back and said "Level 10."
The gasket is made of a hard rubber compound, and should lift right off the pan. Once the gasket is removed, wipe any dirt/debris off of it and set it to the side.
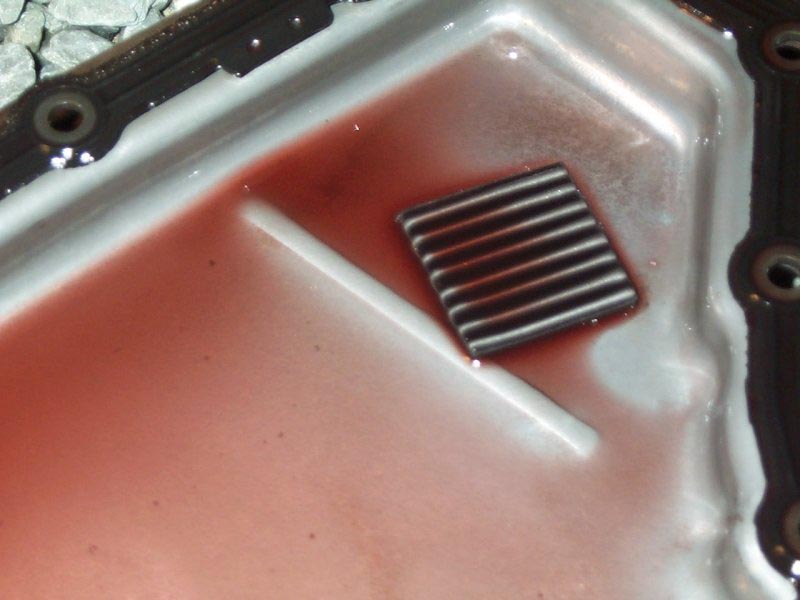
You will notice in the picture above that there is a small black square in the right side of the pan. This is a magnet. This magnet catches the small metallic dust to keep it from circulating throughout your system. It is normal for you to have a thin layer of gray sludge on this magnet.
The pic below is a close-up of the magnet.
Once you have sat the clean gasket to the side, you want to clean the pan out really well. I usually spray mine down with a garden hose, and finish it off with a few paper towels. If you clean yours with water like I do, make sure it is very dry before you put it back on the transmission. It might take a few paper towels to get all the sludge off the magnet. Once it is all clean, sit it to the side.
Once clean, it should look like the pic below.
Here is a pic of the gasket.
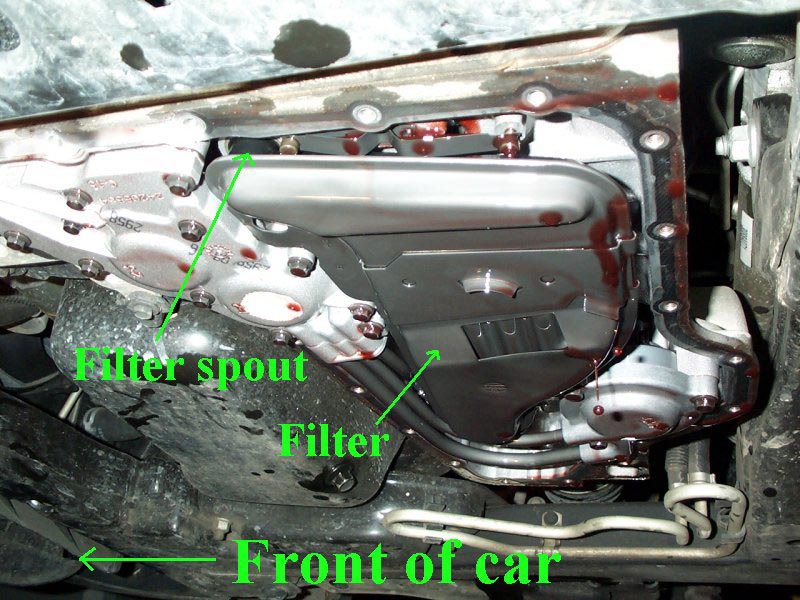
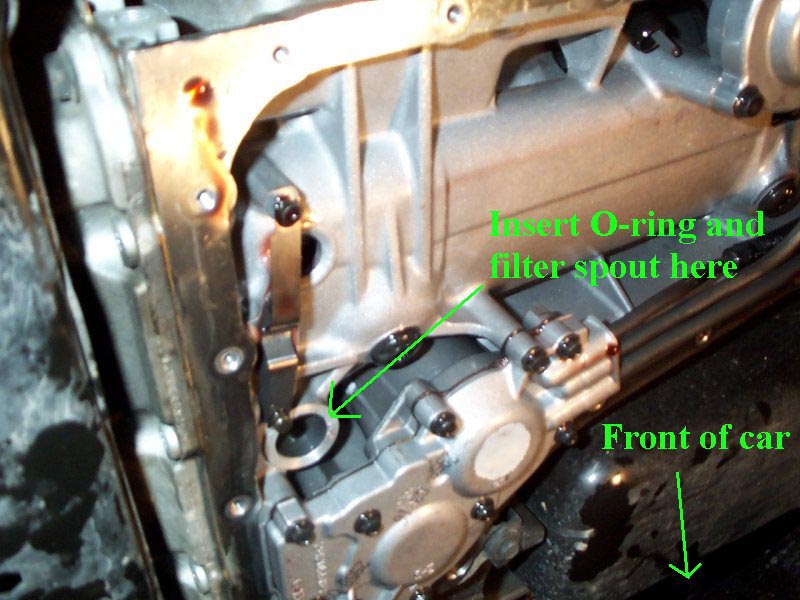
Once the pan is clean, you are ready to remove the filter. The filter is not held in place by anything except for its spout. It is pressed into a circular opening in the bottom of the transmission. There is a small plastic O-ring seal that is slid into the opening that the filter spout slides into. This seal keeps the filter held in tightly
Below is a pic of the new filter and O-ring before it has been installed.

Here is a pic of the transmission after the pan has been removed. I have pointed out where the filter spout slides into the O-ring.
Now here comes the hardest part of the whole procedure.
The filter is simply pressed into the O-ring. You have to tug and tug and twist and pull and curse and pull and tug some more to get the filter spout out. Be careful not to break the spout off into the O-ring. I found it easy to use a long screwdriver to use as a lever to pry the filter out. One thing to be careful about when moving your hands around near the transmission, are the edges. The inner lip where the pan bolts to is very sharp.
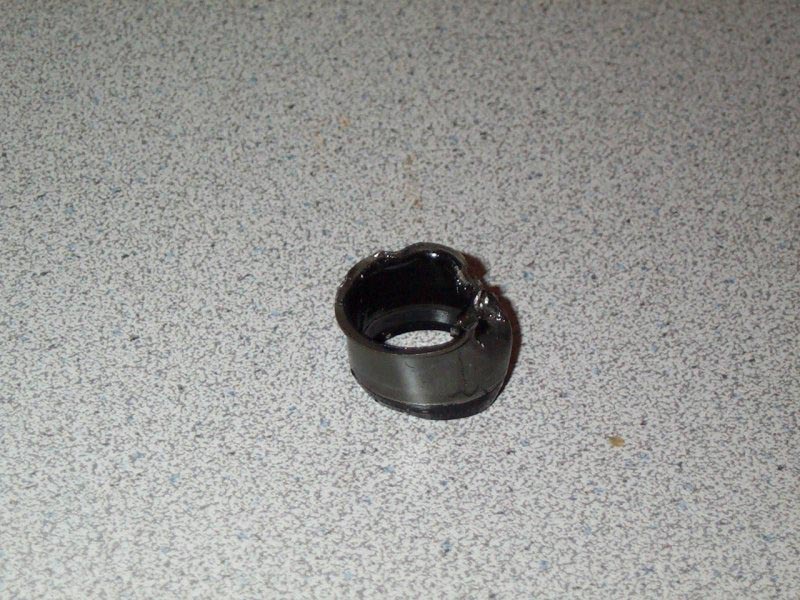
Once you pull the filter out of the O-ring, toss it to the side and prepare for the rough part. If you are lucky that little O-ring will just slide right out of the hole. However, more than likely, your O-ring will seem like it is welded in. I had to get a small flat tip screwdriver and hammer to tap one side of the O-ring until I could get my screw driver under the edge. Then I had to pry it for a while, and it eventually came out. When it popped out, it didn’t even closely resemble the nice round O-ring I put in. Below is a picture of what the mangled O-ring looked like when it came out.
Once the O-ring is out, toss it aside and wipe any debris away from and out of the opening, being careful of the sharp edges of the transmission.
You are now ready to start reassembling.
Below is a picture of the transmission without the filter.
Make sure your new O-ring is free of debris from its edges. Press it all the way into the opening until the edge of the ring is flush with the base. I had to use a hammer and very lightly tap it all the way in. If you do this, make sure you tap it lightly and do not bend the edges of it.
Once the O-ring is seated, press the spout of the filter into the O-ring. I found it easier to rub a little bit of transmission fluid around the spout so it slid into the O-ring easier. I could only press the filter in half way, and I used my hammer to lightly tap it the rest of the way in. I don't think this method of seating the filter is recommended, but it worked for me. Make sure the filter spout is deep enough in the O-ring that it secures the rest of the filter.
Here is a pic of the new filter back in place.

Once the new filter is back on, you are ready to put the pan back on. Line the gasket up with the holes on the pan and line the pan up with the bottom of the transmission. Insert one screw on one side of the pan and hand tighten it. Make sure the screw goes through the hole in the gasket. Next, while still holding the pan up with one hand, insert another screw on the opposite end of the pan and hand tighten, again making sure the screw goes through the gasket.
These two screws should support the pan so that you do not have to hold it anymore. Now just take your remaining screws and start inserting them into holes. The gasket should be lined up with the other holes once a few screws are inserted. Do not tighten any of the screws down just yet.
Just hand tighten all twenty of them. If you have a torque wrench, you want to tighten each bolt down to 10 (ten) ft/lbs. If you don't have a torque wrench, you can use a normal ratchet and tighten each bolt until it is snug, and then make another half a turn. You DO NOT want to over-tighten these bolts as it will split the gasket and cause a leak.
Once you double check to make sure you have tightened all twenty bolts down, you can finally crawl out from under your car and begin knocking dirt off your back and pants. Make sure you properly dispose of the used transmission fluid. My drip pan has a spout on it that can be used to refill the old fluid containers with. Then I take the used fluid to a local transmission shop and they properly dispose of it for me. The sewer IS NOT the proper place to dispose of your used fluid.
Once you have all your tools picked up, you are ready to start dumping the precious transmission fluid back into the transmission. Remove your transmission fluid dipstick and insert the funnel into it. The transmission dipstick is the red-handled dipstick in the back of the engine bay near the center on the drivers side. Your empty transmission should hold 8 quarts. However, after you pour in a few quarts, look underneath the car to ensure you do not have any leaks. If everything is fine, pour in the remaining fluid. One the eight quart, only pour half of it in. After you take your car for a test drive and get the transmission fluid heated up, check the level to see if you need it. If you do, add it. If not, store that last little bit away. You never know when you will need it in a bind. When you check your transmission fluid, you check it with the engine running, and after it has been run for 15 miles or so to ensure the transmission is at operating temps.
Well, you are through. Time to take the car out for a spin.

Any questions, email Brian Trotter: btrotter@pobox.com